Converting A Van Into A Camper - DIY Van Conversion

Van conversions have become incredibly expensive through professional companies. Because of that barrier to entry, many people have opted to convert their vans on their own in a "Do-It-Yourself" way! In this guide, you'll learn about the essentials to converting a van, tips and tricks, and some steps to get your home on wheels transformed!
As someone who was displeased with the cost of having a van professionally converted, I chose to go the DIY route. I'm happy I did as I saved a significant amount of money that was better spent on what I wanted. Whether it's a minivan, Transit, Promaster, or Vanagon, everything you need can be found in this guide.

Just starting out and want a bit more information before diving in? Check out Van Life - The Definitive Guide for answers to all of your questions!

Table Of Contents
Foreward Tips
Planning
Mechanical
Preparation
Cut The Holes And Fill Them
Sound Dampening
The Floor
Insulation
Electrical
Framing
Plumbing
Wall Coverings
Cabinets And Other Furniture
Finishing And Decorations
Tools
FAQ
Conclusion
Foreward tips
- Almost anyone can convert a van on their own with the right knowledge, skills and tools. The internet is your best resource. Many before you have documented their journeys.
- Learning as you go is incredibly rewarding.
- Don't be afraid to be unique and creative. It's your home, not a clone of someone else's.
- Converting your van is meant to be a fun and rewarding experience. There will be hard times when something doesn't go right, but with a positive attitude, it will be a fond and memorable experience.
Planning

Before starting your conversion, you'll want to take time to plan as thoroughly as possible. It's a crucial step to completing your new home and it's where you can get ideas and inspiration on what you want inside of your own van.
Take a look at the following steps and tips to get a sense of what you're about to take on.
- Go through a "lurking" phase while consuming hours of media on others build video series on Youtube, ideas from Pinterest, and guidebooks from other online sources.
- Plan your timeline for building. If possible, align the completion date with a vacancy date from your current home, or have it completed before winter. Compare to other resources online depending on your build.
- Budget for as many purchases as possible. Take into account skeleton materials, technology, home furnishings, appliances, wires, cushions, etc.
- Note how much storage you'll need for the items you intend to bring along.
- Plan your layout with the activities you want to do in your van. Some people love the convertible bed/ table section while others want their bed on a hydraulic lift for more storage. Some folks need a shower, while others want a closet to hang their dresses.
- Practice the layout by using painter's tape on the floor in your home to get a sense of the required space for your build.
- Check with your insurance company to see if they will continue to cover you once your vehicle is converted.
- Try and get a dedicated building space like a garage that you can pay for with a few cases of beer. When that's not available, many people have converted their vans out of Home Depot and Walmart parking lots and even some storage closets.
- If you haven't already decided, now is the time to choose the van you wish to convert.
Here are some common layouts for vans.

As inspiration, here's a van tour of a build that will fit most people's needs.
Ryan Twomey Van tour. Modern build with tech and functionality in mind.
Mechanical
While not a step in the conversion itself, it's probably a good idea to have your vehicle mechanically sound before you start your build. Doing this first will ensure you can take off on your adventure and make it back and forth between Home Depot as many times as you need for those last-minute necessities for your build.
Assuming you have purchased, or are in the purchasing phase, here are some key tips to ensure your vehicle is mechanically sound:
- Take your van to a trusted mechanic for a "peace of mind" inspection.
- Complete upgrades early on so your build timeframe won't be disrupted if your vehicle is in the shop for a few days (or if parts take months to arrive).
- Ensure the suspension system can handle the additional weight of the build.
- Note where all the access points are for tail lights (if accessed from inside) and be sure to build out your van so they can be accessed.
- Note any rust spots from the outside that might need to be cut out or repaired.
Here's a video of some ideas on what to check for when buying your van.
Vancity Van Life. Checking out a van.
Preparation

In this step, which can also be called the demolition phase, you should knock out any framing (if you need to install windows), and disassemble the older build, dividers, etc. During this step, you should also repaint and fix any internal rust spots since they will be incredibly difficult to access after the later steps.
Getting your space ready can be easily done with these key tips:
- A deep clean will keep some ease of mind knowing there's nothing leftover from the previous owner.
- A fresh start (tearing out everything that was previously inside) will allow you to know what the build is made of and be in control of the quality.
- Rust mitigation will ensure your rig is in the best shape as possible for a long time to come. Be sure to sand down any rust spots so you can cover them with the appropriate paint.
- Knocking out some framing pieces for some window installations is critical and a step that should be planned thoroughly.
Here's a walk-through of some of the common steps to fix and prevent any rust from ruining your van.
Mat Estlea. Rust proofing is an important step in prolonging the life of your van.
Cut The Holes And Fill Them

While it seems quite daunting to cut holes in your van, going slow and paying attention to these tips can make it a much better experience.
- Getting this step done early means you don't waste unnecessary materials on framing, insulation, and wall coverings.
- Use masking tape to outline the cut; tape will keep it cleaner. Retaping the already cut pieces can be a good way to percent vibrations and the wobbling of metal.
- Cut your holes on a clear day with no rain in the forecast since you don't want rain inside your van.
- Tape a plastic bag under your roof vent hole cut so you can avoid having metal shaving everywhere in your van. Ensure you thoroughly clean afterwards as there will be metal shaving everywhere.
- Be sure to file down and rust-proof the new edges of the hole you made.
- Plan ahead for anything externally mounted like propane tanks, water reservoirs/ access, or shore power and the input for solar panels.
Take a look at this video if you want to see how to cut and install a roof fan for your van
Linnea & Akela. Maxx Fan install.
Sound Dampening

In reality, it's impossible to completely isolate a van from inside and outside noises. So, it's not considered soundproofing as much as it's considered sound deadening, or dampening. While the bare metal shell is still accessible, it's good to use this time to work on the sound deadening.
- This step is done early before the walls and floor and ceiling are covered.
- Typical materials like the Kilmat are used for normal automotive purposes but work well for the application of the house area of your van.
- If you have time, you can use these sound-dampening mats in your headliner, and even the front doors.
- It's satisfying to knock on the vehicle and have it sound like a dead noise vs. the clanging of metal.
- Not only does it help with the sound of rattling of your van build on back roads, it helps keep noise out, and noises in.
- This is a laborious task due to the necessity of needing to use a roller with a lot of pressure on all the mats.
Sound deadening, while optional, is an important step in your van build as seen in this video!
The Floor
Usually, people will install a subfloor of wood framing in a jigsaw puzzle manner and insulate between the pieces of wood. After that, they may choose to lay down proper flooring.

- Doing this early makes it so that you don't have to cut so many custom angles of floorboards.
- Doing it early helps with keeping your floor a bit more waterproof as you get more coverage.
- Choose a waterproof insulation material for its ability to not retain moisture when you inevitably spill coffee.
- If possible, use pressure-treated wood for the frame of the floor, or stain and seal the wood you use.
- Forego using vinyl flooring as it tends to warp and lose its adhesion over time.
- Typically, click flooring is used in most van conversions. What's nice is that you can usually find small amounts of it (but adequate for the small space of a van) on sale due to it not being enough for a normal home.
- Some builds use liquid nails instead of affixing the grided wood to the floor to prevent any exposure to moisture from below.
In this video, you can see how someone installed the floor of their van!
DualEx. Van floor framing, insulation, and finishing.
Insulation
With all the spaces allotted for holes, you can start your insulation. Some guides will say to do this after the framing, but doing it from the get-go allows you to not have to work around studs or other framed pieces.
Check out the Autogenic Amusements guide to winter van life for the information on insulation during the season that it matters most:

- Don't use fibreglass. Wool (Havelock) and synthetic (Thinsulate) often work the best for campervans.
- The foam board insulation is great as you can cut it to size. Then using spray foam around the borders helps lock it in, and works on the curved surfaces.
- Cover as many surfaces as possible (even in the framing channels if you can access them).
- Using foam to cover surfaces like your wheel wells is a common approach to save a bit of money on the more expensive types of insulation.
- Calculate ahead of time how much insulation you'll need, and add a bit to spare.
- Reflectix doesn't have the greatest R-Value compared to the other options. The setup requires additional space since it works best when there is an air gap to work with.
Here's a video using one of many techniques to insulate a van from the cold and heat.
Paul Messner. Insulation installation in a campervan.
Electrical

Having an electrical system in your van is a luxury that allows you to make your mobile home experience as seamless as possible. You can go as complicated or as simple as you want.
This step will include lights, outlets, power to the heater and any other 12v accessories. It will also include solar panels and your DC-DC charger if you chose to go that route.
This is perhaps the most complicated and advanced step in a van conversion. Don't worry though, many people started with no knowledge to knowledge of being able to troubleshoot their own system.
- It's important to do this step early so you can access the channels/ braces/ beams that exist in a van already. You can use these channels for wiring passages.
- Ensure you understand how your entire system will work together. Drawing a diagram is a great way to plot out the system.
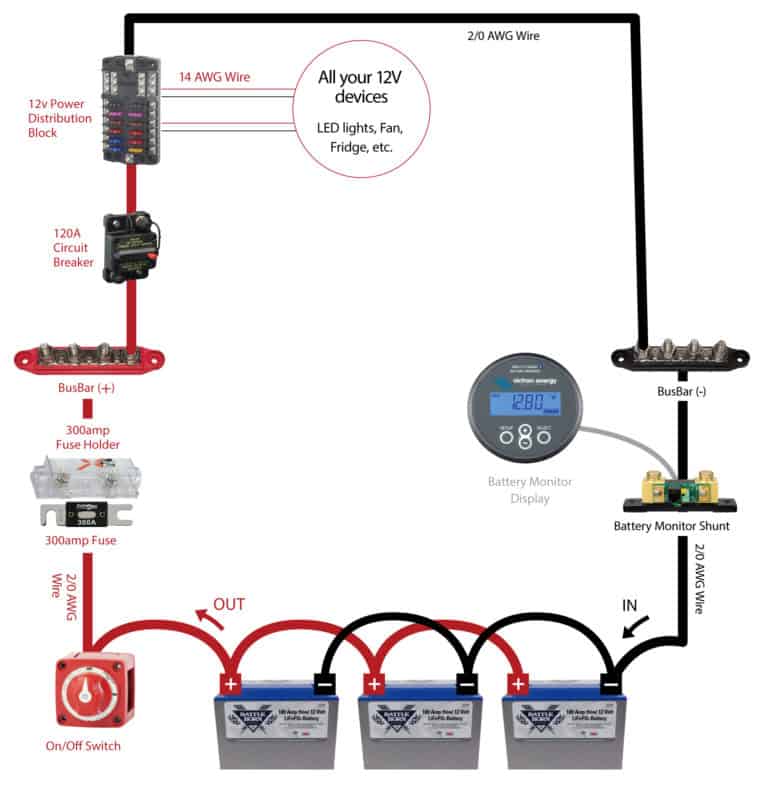
- Try as hard as possible to future-proof your electrical system. Running some extra wiring around your van can leave space when you need to add something in the future.
- Because your rig will be in a constant earthquake when driving down backroads, ensure your fittings are as tight as possible during installation. (Trust me, I've rattled many wires loose).
- Try using DC(Direct Current) as much as possible since AC(Alternating Current) is much less efficient when being inverted. Avoid household lamps, lights, fans, fridges, etc.
- Install your heater in a spot that can warm both the main living area and your garage area to keep your batteries, water, and anything else you've stored warm.
- Roof-mounted solar panels are a great way to take in energy while stationary. DC-DC inverters are great for charging while driving.
- Using 12V led lights on a dimmer switch is standard practice for most van dwellers.
- Having a 2000W inverter can allow you to power most home appliances like a blender, low-wattage kettle, and even some hairdryers.
- Bite the bullet and go with a lithium battery from the get-go. Non-lithium batteries are not the best for vans since they come with limitations like needing to stay at about 50% SOC(State of charge). Some modern lithium batteries come with self-warming features, so you won't accidentally injure the cells when using them in the cold.
- Use a larger fuse panel from the start since you might want extra space in the future.
- Alternatively, there are solutions like the Jackery portable battery generator that make your electrical system as easy as plug-and-play.
- When possible, use USB outlets that plug into your 12v Fuse panel.
- 12V refrigerators are the best for van builds as they draw less power and are less heavy than home-style mini-fridges.
Here's a video about wiring your van's electrical system.
Van Kookz. Van conversion wiring
Since it's such a huge topic, take a look at a more standalone video explanation with Will Prowse.
Will Prowse. Solar system installation for the van.
Framing
Now that you have everything in place, you can start to frame the van for attachment points for the walls and bracing for any furniture you might build. You might also come across the framing being called furring strips.
Below are some key points to ensure you build the skeleton of your van well.
- Frame more than what's required. It will make your walls much more sturdy in situations where your push buttons and plug into outlets on the walls.
- Try and keep the framing as low profile as possible since the dimensions inside your van are already quite constrained.
- Rear doors sometimes have hollow spots, if you can frame them to make the space usable, try and do so.
- Keep in mind that you want your framing to be bomb-proof. Rivetting is a common way to ensure the framing is affixed incredibly well.
- Pressure-treated wood is a good option as you will be fighting a constant battle with moisture in your van. Sealing the wood is also another good option.
- If you plan to build a shower, do this early too since you don't want to waste materials that are simply going to be covered up by another more waterproof material.
- Take a look at this post about showering in a van to see if it's worth it to you.
This video goes over some important information for framing your van.
Alluvium Inc. Bomb-proof framing for your campervan.
Plumbing
Having a plumbing system can be a luxury while living on the road. As with all the other aspects of your van, you can make your plumbing system as simple or as complicated as you desire.
Generally, you'll need some way to pour water, some way to catch it, and some way to store the used stuff.
- Regarding the bathroom situation, most options range from a shovel to a cassette toilet, or even a luggable loo. It's uncommon to have a full-on blackwater (toilet waste) tank in most campervans.
- If you desire to have an electrical pump, be sure to wire it into your electrical system.
- Foot pumps are a low-tech, high-functionality solution for a sink. They break less easily and don't require anything else than your strength.
- A common way to store water is in water cans, jerries, or bluies. Alternatively, you can choose a larger reservoir and even mount it onto the underside of your van.
- Keep in mind that you'll want to make your system in a way that you can winterize (empty, purge, etc.) or, or keep it warm enough to not freeze during the winter.
- Your faucet can range from a simple hose or spout, a USB-powered electrical tap, or even a full-fledged faucet similar to the ones you'd find in a home.
- You want your sink to be large enough to fully surround your dishes. Any smaller and doing dishes will be messy. Alternatively, if you go large enough, it can be used to store other items or a few days' worth of dirty dishes.
- Being mindful of how much water you use can make it easy to store grey water (dish water, toothpaste, hand soap) in a similar-sized water jerry as your fresh water.
- Having a grey water tank like classic RVs is a luxury, but not required. You might find it difficult to find places to dispose of it and when you conserve enough water, it doesn't make sense to have such a large tank.
- Using plastic tubing is a great option for van life as it can be installed in tight spaces and corners.
Here you can see a simple and functional plumbing system for your van.
Linnea and Akela. Cheap and easy plumbing system.
Alternatively, here's a much more luxurious, but complicated plumbing system.
Explorist life. DIY plumbing system.
Wall Coverings
Now we begin to beautify the inside of your van! Choosing the right material is important, but most materials can be painted to whatever colour or pattern you prefer.
- Keep the framing points in mind by marking them so you know where your attachment points are once you've covered them all up.
- A light material is best for this step.
- Sand everything before installation.
- Wood panelling or shiplap is a popular option that many van lifers choose to go with.
- If possible, ensure your backsplash is cleanable. Using stick-on tile is great since normal tile and grout likely won't survive the constant earthquake your van is in.
- You might need to make some precise cuts since you'll be working around all of the items that already exist like your windows, fans, outlets, etc.
- Whatever material you choose, keep in mind that Home Depot will do a certain amount of cuts for free with their industrial-sized saw. If you plan to build your rig piecemeal, then using their services every time you pick up a batch of materials can save time, effort, and money.
Check out how a professional builder tackles their panelling.
Titan Vans. Wall panelling.
Cabinets And Other "Furniture"
The cabinets and furniture you choose to put in your van are often one of the highlights of your build. It allows you to make your space work the way you want and allows for a lot of ingenuity and creativity.
This step will include shelves, cabinets, drawers, sink mounts, bedframes and cooktops.
- Ergonomics are important when building the heights of counters and seats. Try and take note of your favourite seat or desk in your home, and replicate the dimensions of the seat height, depth, and width.
- Maximize the depth and height of drawers and cabinets since storage will be a premium.
- Try to make things multi-purpose. Build a bench on top of your toilet or fridge, and make your sink top at standing desk height to create another workspace.
- While most people want a convertible bed to a dinette, oftentimes those owners end up disliking the idea since it needs to be twice a day to make use of it.
- Building a tall closet to hang clothes might be a good idea if you need clothing to be wrinkle-free.
- Find inserts, totes, or storage bins to use within your drawers and cabinets as everything will get mixed up on the first back road you drive on.
- Affix the furniture and cabinets to the anchor points (furring strips) in the wall to ensure maximum sturdiness.
- If not already done, build the framing for your appliances and install them here.
Here's a guide on how to build your own upper cabinets.
Here's some inspiration for your kitchen/ galley area.
Salty Vanventures. DIY kitchen build.
Finishing And Decorations
Now we've reached the end where you can add your artistic touches to your van. How you choose to decorate and finish your van will allow you to create your own style.
- Flooring can be done here if you don't mind cutting pieces to fit around everything you've installed on top of your subfloor.
- In this step, you should be painting everything and installing your hooks, cabinet handles, etc.
- If built properly, you can always repaint and redecorate with new finishings if you get tired of the colour or don't like it down the road.
- A durable paint will be important to prevent nicks and chips.
- If possible, bring along a real plant to add some life to the small box you now call home. If not, find some fake plants.
- Velcro or double-sided tape works well when you need to place pictures on the walls, or decorations on surfaces. Remember, anything not secured will end up on the floor eventually, and maybe even broken.
Tools
In the buyer-archy of needs, borrowing is the best way to acquire tools. Find someone, anyone, and be relentless about asking to rent. These tools will add up in price, and even renting them for the time required adds a lot to your build cost.
- Safety first! Wear glasses and gloves whenever appropriate.
- Rent as much as possible since the use of these items is likely to be temporary.
- A jigsaw with a guide can accomplish a lot of cuts that a table saw might.
- A Kreg jig is invaluable for building square furniture and cabinets.
- Of course, you'll want a drill with different bits.
- A palm sander works for such a small amount of materials.
- A good measuring tape is important as you'll be working with many small and unique shapes and spaces.
FAQ
How much does it cost to convert a camper van?
The answer to this question depends on the features and quality of the build you want. On the cheaper end, it can cost as little as what your camping sleeping pad and sleeping bag cost. On the higher end, having your conversion done through a professional can cost around $250000.
Is it easy to convert a van?
Yes, it is easy to convert a van. It's a matter of perspective. As long as you're willing to learn, research, and adapt, the process of converting your van is easy. While it may be laborious and research-intensive, the systems are smaller than commercial applications and even the custom cabinetry is smaller than what's installed in mansions. It's a matter of perspective.
How long does it take to convert a van?
For a more timeline-based answer, the simplest vans can be completed in just a few weeks, while more complex models may take up to 2-3 years.
The amount of time you spend on your van conversion depends on what you want to build and include in it. Another factor to keep in mind is your experience and skills.
If you're doing a simple and low-tech conversion, it might only take a week. Alternatively, if you're including all the bells and whistles, well, it might never be considered "complete".
Conclusion
In conclusion, converting a van is an incredibly fun and challenging experience. You learn so much while allowing your creativity to flourish. It's a daunting task, but you can do it with the right information.
With this guide and the resources included, you're sure to walk away with the knowledge required to turn your blank slate into a home on wheels.
Leave a comment below to share any tips and tricks you've learned while converting your own van.


Member discussion